Preparing for Paws: Pre-Travel Checklist for Pet-Friendly Journeys
Embarking on a journey with your furry companion can be an enriching experience, but it requires careful planning to ensure their safety, comfort, and happiness throughout the trip. Whether you’re road-tripping or jet-setting, taking the time to prepare adequately can make all the difference. Here’s a comprehensive pre-travel checklist to help you and your pet enjoy a stress-free adventure together.
1. Schedule a Vet Check-Up
Before hitting the road or taking to the skies, schedule a visit to your veterinarian for a thorough check-up. Ensure your pet is up-to-date on vaccinations and discuss any health concerns with your vet. Additionally, request copies of your pet’s medical records, including vaccination certificates and prescriptions, to carry with you during your travels.
2. Identification and Microchipping
Proper identification is crucial in case your pet gets lost during your journey. Ensure your pet wears a sturdy collar with an ID tag containing your contact information. Consider microchipping your pet for an added layer of security. Update your contact details in the microchip registry before traveling, providing current information in case your pet is found far from home.
3. Pack Essentials for Your Pet
Just like you, your pet needs a travel kit with essential items. Pack enough food and water for the duration of the journey, along with collapsible bowls for easy feeding and hydration on the go. Don’t forget to bring your pet’s favorite toys, bedding, and any medications they require. A familiar blanket or toy can provide comfort in unfamiliar surroundings.
4. Secure a Pet-Friendly Accommodation
Research and book pet-friendly accommodation well in advance of your trip. Look for hotels, rental homes, or campsites that welcome pets and offer amenities like designated pet areas or walking trails. Confirm their pet policies and any additional fees or restrictions before making reservations. Booking pet-friendly accommodation ensures a comfortable stay for both you and your furry friend.
5. Plan Rest Stops and Exercise Breaks
During long drives, plan regular rest stops and exercise breaks for your pet. Choose pet-friendly areas where your furry companion can stretch their legs, relieve themselves, and get some fresh air. Keep your pet on a leash during rest stops for their safety and respect the rules of each stop to maintain cleanliness and orderliness.
6. Safety in Transit
Whether you’re traveling by car, train, or plane, prioritize your pet’s safety during transit. Use a secure pet carrier or harness to restrain your pet in the vehicle, ensuring they remain safe and calm throughout the journey. If flying, familiarize yourself with the airline’s pet policies and requirements, including carrier specifications and health documentation.
7. Research Pet-Friendly Attractions and Activities
Before reaching your destination, research pet-friendly attractions and activities to enjoy with your furry companion. Look for parks, beaches, hiking trails, and outdoor cafes that welcome pets. Check local regulations regarding pets in public spaces and be mindful of other visitors and wildlife during your adventures.
8. Emergency Preparedness
Prepare for unforeseen circumstances by having an emergency plan in place. Carry a pet first-aid kit containing essential supplies such as bandages, antiseptic wipes, and tweezers. Research veterinary clinics and pet emergency services along your route or at your destination. Knowing where to seek help in case of an emergency can provide peace of mind during your travels.
9. Practice Patience and Flexibility
Traveling with pets requires patience, flexibility, and a sense of adventure. Be prepared for unexpected challenges and changes to your itinerary. Stay calm and adapt to your pet’s needs, whether they’re feeling anxious during transit or exploring new surroundings. Your positive attitude and reassurance will help your pet feel more relaxed and comfortable throughout the journey.
10. Enjoy the Journey Together
Above all, cherish the time spent exploring new destinations with your beloved pet. Embrace the unique bond you share and create lasting memories together. Be present in the moment, savoring each experience and enjoying the journey as much as the destination. With proper planning and preparation, traveling with your pet can be a rewarding and unforgettable adventure for both of you.
By following this pre-travel checklist and taking proactive steps to ensure your pet’s well-being, you can embark on a journey filled with joy, companionship, and unforgettable moments. Bon voyage!
Sniffing Out Trouble: A Guide to Locating a Deceased Rodent in Your Living Space

Introduction: The Unpleasant Discovery
Finding a dead rodent in your living space is never a pleasant experience. Aside from the unpleasant odor, it raises concerns about hygiene and potential health risks. However, locating the source of the problem is the first step toward resolving it. In this guide, we’ll explore effective strategies for sniffing out trouble and identifying the presence of a deceased rodent in your home.
1. Recognizing the Signs
a. Unusual Odors: One of the first indicators of a deceased rodent in your home is a strong, unpleasant odor. Dead rodents emit a distinctive smell that can be likened to that of decomposing organic matter.
b. Presence of Flies or Maggots: Another sign to watch out for is an increase in the presence of flies or maggots in your living space. These insects are attracted to the scent of decaying flesh and can lead you to the source of the problem.
2. Conducting a Systematic Search
a. Start with Common Hiding Spots: Begin your search in areas where rodents are likely to hide or travel, such as attics, basements, crawl spaces, and behind appliances. Look for any signs of disturbance or unusual activity.
b. Use Your Sense of Smell: As you search, rely on your sense of smell to guide you toward the source of the odor. Move slowly and deliberately, paying close attention to any changes in the intensity of the smell.
c. Check Concealed Spaces: Don’t overlook concealed spaces such as wall voids, air ducts, and ceiling cavities. Rodents often seek out secluded areas to nest and may perish in these hidden locations.
3. Employing Detection Tools
a. Black Light: In some cases, using a black light can help detect the presence of bodily fluids or secretions left behind by rodents. Shine the black light around suspected areas to look for any telltale signs of contamination.
b. Rodent Detection Devices: Consider using electronic rodent detection devices that emit high-frequency sounds to attract rodents out of hiding. These devices can help draw out any remaining live rodents, making it easier to locate and remove them.
4. Taking Action
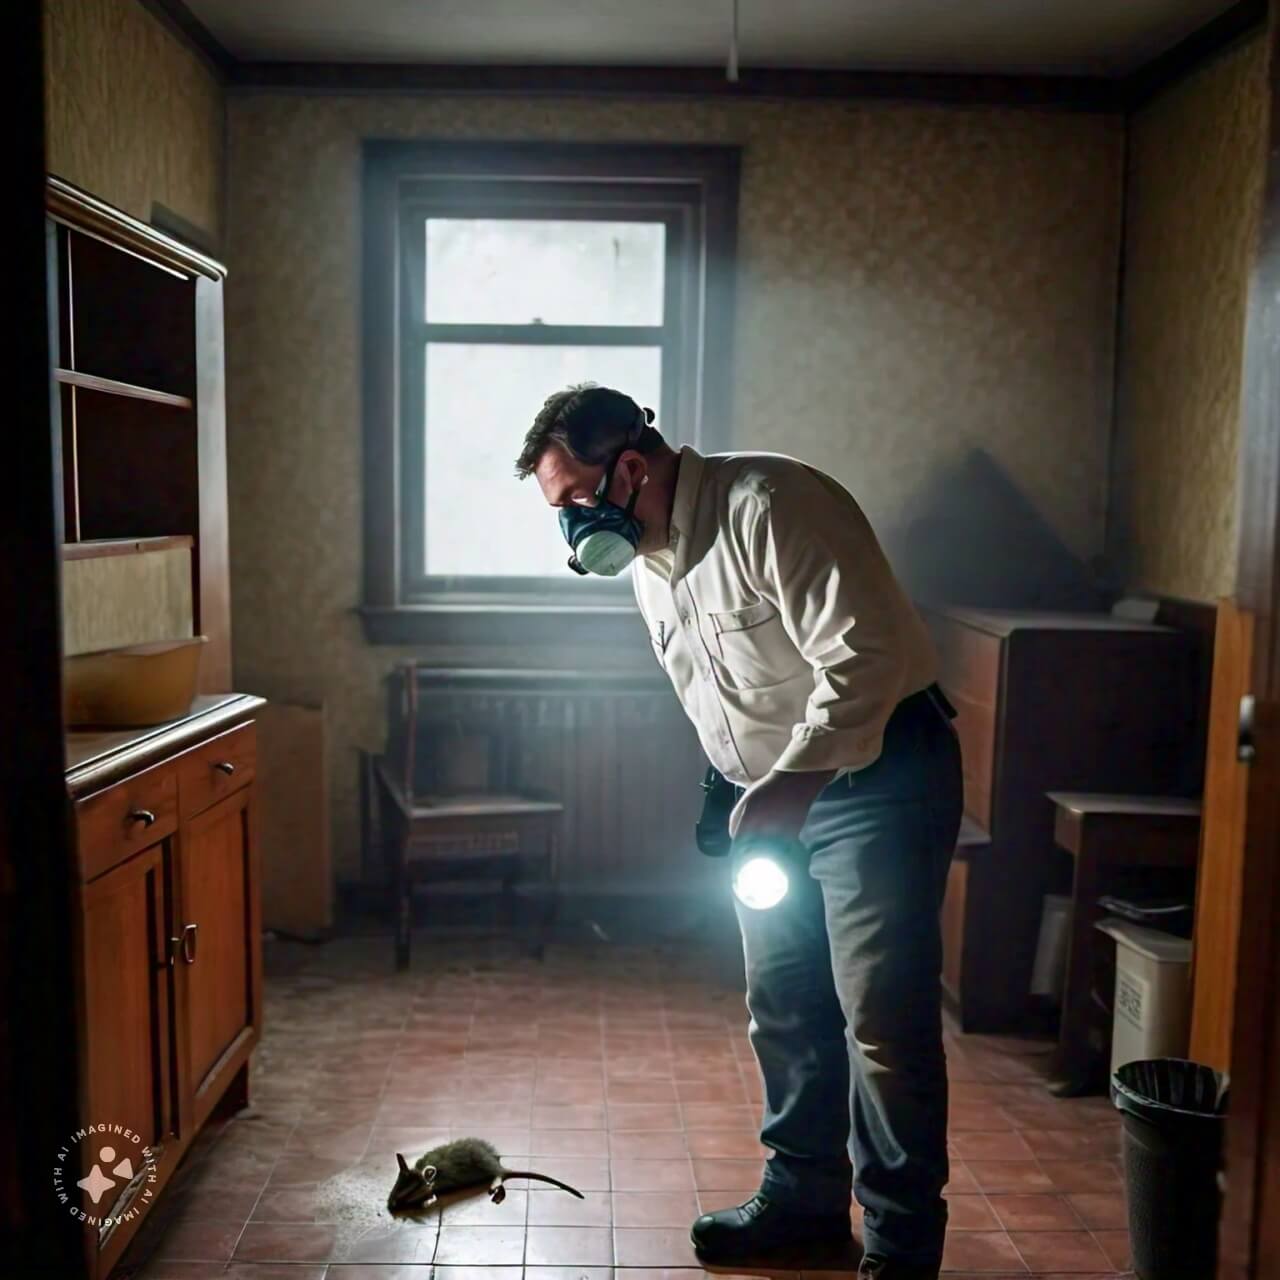
a. Wear Protective Gear: Before handling any deceased rodents or contaminated materials, be sure to wear appropriate protective gear, including gloves, a mask, and goggles, to minimize exposure to harmful bacteria and pathogens.
b. Safely Dispose of the Carcass: Once you’ve located the deceased rodent, carefully remove it using a pair of disposable gloves and place it in a sealed plastic bag. Dispose of the carcass in an outdoor trash receptacle to prevent further contamination.
c. Clean and Disinfect: After removing the carcass, thoroughly clean and disinfect the surrounding area using a mixture of bleach and water or a commercial disinfectant. Pay special attention to surfaces that may have come into contact with the rodent or its bodily fluids.
Conclusion: Restoring Peace of Mind
While discovering a deceased rodent in your home can be unsettling, following the steps outlined in this guide can help you swiftly identify and address the problem. By recognizing the signs, conducting a systematic search, employing detection tools, and taking prompt action, you can effectively sniff out trouble and restore peace of mind to your living space. Remember to prioritize safety and hygiene throughout the process, and don’t hesitate to seek professional assistance if needed.
Navigating the Maze: Tips and Tricks for Finding a Deceased Rat in Your House
Unraveling the Mystery: Where to Begin?
Discovering a deceased rat in your house can be unsettling, but it’s essential to address the situation promptly for hygiene and safety reasons. However, pinpointing its location can sometimes feel like navigating a maze. Here are some tips to help you unravel this mystery efficiently.
Trust Your Senses: The Power of Observation
1. Use Your Nose: The first step in finding a dead rat is often following your sense of smell. Rats emit a distinct odor when they decompose, which can help lead you to their final resting place.
2. Listen for Clues: While not as reliable as your sense of smell, listening for unusual sounds such as scratching or gnawing can sometimes indicate the presence of rodents.
Conduct a Systematic Search: Room by Room
1. Start in High-Risk Areas: Rats are attracted to areas with food, water, and shelter. Begin your search in places like kitchens, pantries, basements, and attics.
2. Inspect Common Hiding Spots: Check behind appliances, inside cabinets, under furniture, and in dark corners where rats might seek refuge.
Utilize Tools and Techniques
1. Shine a Light: A flashlight can help you peer into dark crevices and corners where rats may be hiding.
2. Use Traps as Guides: If you’ve previously set traps, check them for activity. A triggered trap could indicate the presence of a rat nearby.
Take Precautions: Safety First
1. Wear Protective Gear: When searching for a dead rat, wear gloves and a mask to protect yourself from potential contaminants and pathogens.
2. Ventilate the Area: If you’ve located the deceased rat, ensure proper ventilation to disperse any lingering odors and improve air quality.
Dispose of the Rat Properly
1. Seal the Rat in a Bag: Use a plastic bag to carefully contain the deceased rat, minimizing contact with it.
2. Disinfect the Area: Thoroughly clean and disinfect the area where the rat was found to eliminate any bacteria or germs it may have left behind.
Conclusion
While finding a deceased rat in your house may not be a pleasant experience, it’s a problem that needs to be addressed promptly. By trusting your senses, conducting a systematic search, utilizing tools and techniques, taking safety precautions, and properly disposing of the rat, you can effectively navigate the maze and rid your home of this unwelcome visitor.
The Rat Hunt : Strategies for Uncovering and Removing a Dead Rodent from Your Home
Uninvited guests of the rodent variety can quickly turn from a minor nuisance to a major problem when one of them meets an untimely demise within the confines of your home. The presence of a dead rat not only poses health risks but also emits a foul odor that can permeate your living space. Fear not, for with the right strategies and a dash of patience, you can successfully locate and dispose of the deceased intruder. Below, we outline some effective methods for tackling this unpleasant task.
Sniff Out the Problem
Your Nose Knows: The unmistakable stench of a dead rat is often the first sign of trouble. Trust your sense of smell to lead you to the source of the odor. Be sure to check areas where rats are likely to hide, such as behind appliances, in wall voids, or beneath floorboards.
Follow the Trail
Look for Signs: Keep an eye out for telltale signs of rodent activity, such as droppings, gnaw marks, or shredded insulation. These indicators can help narrow down the search area and guide you toward the deceased rodent’s final resting place.
Utilize Technology
Go High-Tech: Infrared cameras or thermal imaging devices can be invaluable tools for locating hidden rodents, even in the darkest corners of your home. Invest in or rent such equipment for a more efficient and thorough search.
Employ Baits and Traps
Lure Them Out: Place baited traps strategically around your home to attract any remaining live rodents. Once captured, dispose of them properly to prevent further infestation and hasten the end of the rat hunt.
Conduct a Systematic Search
Methodical Approach: Divide your home into manageable sections and search each area systematically. Start with the rooms closest to where you first noticed the odor and work your way outward. Check both common hiding spots and less obvious areas, such as crawl spaces or attics.
Gear Up for Cleanup
Protect Yourself: Before handling the deceased rat, don a pair of gloves and a face mask to minimize contact with potentially harmful bacteria and allergens. Use a sturdy plastic bag or disposable gloves to pick up the carcass and seal it tightly for disposal.
Deodorize and Disinfect
Banish the Odor: After removing the dead rodent, thoroughly clean and disinfect the surrounding area to eliminate any lingering odor or bacteria. Use a mixture of bleach and water or a commercial disinfectant to sanitize the affected surfaces.
Seal Entry Points
Prevent Future Intruders: Once the rat has been removed and the area sanitized, take proactive measures to seal off any entry points that may have allowed rodents to enter your home in the first place. Patch up cracks, gaps, and holes in walls, floors, and foundations to deter future infestations.
Monitor for Recurrence
Stay Vigilant: Keep an eye out for any signs of recurring rodent activity, such as fresh droppings or gnaw marks. Address any potential entry points or nesting sites promptly to prevent another infestation from taking hold.
In conclusion, while discovering a dead rat in your home may not be the most pleasant experience, it is a solvable problem with the right approach. By following these strategies and remaining diligent in your efforts, you can successfully uncover and remove the deceased rodent from your living space, restoring peace of mind and cleanliness to your home.


